
Luring Healers on Wave 9
This is a guide on how to get optimal lures on wave 9 in leeches. It's not the only way to get decent lures, but it's what I find most consistent. The method involves splitting healers on the cannon, and it's possible to get up to a 5 way split. From my experience it's common to get 3 and 4 way splits, and uncommon to get 2 and 5 way splits. I've put together a video with a few examples, and this guide covers the theory behind it and highlights the timing and positioning required to pull it off successfully. If you have any questions or suggestions please post it here or DM me on discord or ingame
")
Wave 9 can be one of the most frustrating waves as a healer, and luring the penance healers makes the 3rd call easier for your healer since they don’t have to chance multiple penance healers during the 3rd and 4th call. An improvement to this is to split the healers on the cannon, which means that your healer will be able to distinguish which penance healers need to be repoisoned and which do not.
The codes
This method requires you to use the code 2-1-5*-2 or preferably 3-1-4*-2 when you have the chance. A couple of examples of 2-1-X-2 can be seen in Twoless’s videos here. The 5* and 4* indicates that you drop a wrong food for the 8th runner so that it ‘blughs’ and walks 3 squares north. This allows you to relure all the healers that are surrounding you at 60s.
Whilst this is great, it also means that if you use the lure spot south on the wall, you tend to stack all the healers south on the wall, which makes if difficult for your healer to tell which healers they need to repoison. This post covers how to split the healers on the cannon such that you can get a up to a 5-way split in the best-case scenario. A 4-way split seems to be the most common when using this method, but it depends on how the healers move and exactly when the healers agro the 8th runner and you.
NOTE: This method requires the last healer to spawn at 66s. There are ways to adapt this which will be covered at the end. If the last reserve spawns at 78s or later, I recommend using the traditional lure spot south on the wall.
Some notes on 2(3)-1-X-2
There are several ways of pulling off this code depending on the permutation, and in many cases you can use Twoless’ method referred to in the previous section. Another way to execute the code is to drop 1 wrong food north of the trap after killing the first 2(3) runners, and multi the 3rd and 4th runners (or 4th and 5th if 3-1-X-2) – Thanks to Mottis for pointing this out.
How to 3-5 way split healers on the cannon
Part I: The setup
- Get 2 logs
- Make sure 2 or 3 runners die before standing on the food north of the trap
- Fix the trap, then kill 1 runner and stand on the trap food until the 8th runner spawns
When the 8th runner walks south or east
- Drop 1 wrong food and multi the 8th runner whilst stepping to the east side of the trap. This will prevent healers moving south
- The multi kill will happen at 60s, so call for the healer immediately, then fix the trap
- If you use the code 2-1-5*-2, put the 3rd food you have left in the inventory south of the trap. It does not matter whether this is the correct or wrong food, but will prevent the 9th runner from crashing. If you use 3-1-4*-2 you don’t need to put a wrong food south
- Multi the 7th runner whilst stepping to the east side of the trap.
- Repair the trap, and stand still and wait for the healers to agro the 8th runner which should be approaching the trap between 54s and 60s.
There are a few squares you can run to for the next part. The important thing to notice is that the distance between square you step on and the square you end up on at the cannon is an even number. This is to ensure you run onto the last square instead of walking. Walking onto the last square often results in 3 way splits that otherwise could've been 4-5 way. Note that you can always run to the square east of the hopper if you don't start from the squares marked below, but timing has to be adjusted accordingly, which will be covered next.
Figure 1: a few starter squares you can use, but I tend to use squares marked in red.

Notation on the illustrations belowNOTE: It seems like you need to be logged in to be able to see the pictures in a readable format.
I’ve put together a few pictures of what ideally happens, and why this method works. It is likely that a couple of healers stack, but this is still an improvement from stacking 4+ healers south on the wall, or risking not getting relures at all.
Disclaimer: The pictures illustrate an ideal situation, and the exact patterns shown are unlikely to occur consistently. However, by following a few tips and tricks you should be able to get 3-4 way lures pretty consistently.
Notation:
- D1: The square where you wait until the closest healer reaches H1
- D2-5: It takes 1 tick to run to D2, another tick to run to D3 etc.
- D5: The square you want to click on when the closest healer reaches H1
- H1: Healer’s starting point when you click on D5
- H2-4: It takes 1 tick for the healer to reach H2 etc.
- H5: The square that the healer ends up at
- L1-5: Where all the final lures will end up, L1 being the last reserve which spawns at 66s.
- Run to the square marked as D1 in figure 2 or 3, but make sure that the last reserve has already agroed you - it should spawn at 66s.
- Wait for the closest healer to reach the line that’s diagonal with the trap if you’re using the starting square on figure 3 (marked as H1). Run 1 tick earlier if you use the starting square on figure 2.
- Click on the square on the cannon marked as D5.
Figure 2: Positioning and timing

Figure 3: Positioning and timing, but the cycle is one more tick (6 here vs. 5 above)
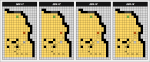
Figure 4: Optimal lures
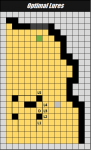
Figure 4: Optimal lures
Tips and tricks:
- When learning this method, focus primarily on the first healer that is closest to you (lure #1) and run from D1 to the lure spot once the closest healer reaches H1. Once you become more comfortable you can start making a judgement call of whether to stack the 2 closest healers etc.
- If the last healer spawns after 66s, you can stand on the square east of the trap for longer. If the last healer spawns at 72s you can just run to D1 at after it spawns, but if it spawns later you can either drop another wrong food, or simply lure on the wall since the healer should already have finished restocking at that point.
- If you see that the 2 closest healers to you don’t need to be repoisoned, you can wait until the 3rd healer reaches its starting square H1.
- You can run to the square north of D in figure 4 (east of the hopper) if you don't use the marked squares in figure 1, and you'll still run onto the last square.
Last edited: