
The purpose of the following guide is aimed at developing an understanding of penance healer mechanics, good healer technique and breaking down heal codes. Although this is aimed at beginners, certain parts may be of use to ranks that have already passed a trial and are wishing to develop a further understanding. This guide is going to be aimed at healing in leeching scenarios specifically, although the basics of healing in leeches and in fun runs do carry over so may be of use for those wishing to only heal in funs.
Please note if you're wishing to trial you don't have to know every part of this guide inside and out, however a trialler will be taking into account the core elements of this guide such as technique and the application of codes when delivering their verdict.
This guide doesn't cover all of the heal codes specifically, the first part of this guide will explain technique and key strategies to help you with furthering your consistency healing. The second part will break down how to read and understand codes as well as adapting to different situations.
If you're already comfortable with healing and simply wish to view the codes used in leeches then you can view a list of leech healer codes here with video examples of them being executed.
The general strategy of healer is simple: Your goal is to spawn reserves, then let all the other healers die over time from constant poison damage.
In a wave with two reserves this usually means you will aim to spawn the first reserve as fast as possible, so it can take damage over time, whilst only poisoning the others enough to keep them ticking 4s. The final reserve is designed to be late so that the defender can lure it allowing you to easily spam food into it to finish it off quickly.
If you have any questions regarding anything in this guide then don't hesitate to ask a trailer, healer rank or teacher in BA School.
Below is an overview of core components for each wave as healer. All of these will be explained in further detail below.
Wave 1:
30s end - optional bump first runner if it’s east.
Wave 2:
<42s end Block the last runner- optional bump first runner if it’s east.
Wave 3:
24s reserve <42s end block the last runner - optional bump first runner if it’s east.
Wave 4:
<48s end - trap the reserve healer - optional block the 24s runner from going west.
Wave 5:
Trap the reserve healer.
Wave 6:
Restock after the first call.
Wave 7:
Regular / single overstock: 2nd call target first 2 healers (if applicable) to force out reserve spawns on time repoison anything ticking a 3. Restock after the 2nd reserve spawns.
Double overstock - restock after first call.
Wave 8:
Guess the food on the 30s healer spawn. 2nd call target first 2 healers (if applicable) to force out reserve spawns on time repoison anything ticking a 3. Restock after poisoning the last 2nd call reserve spawn. Fill vial before restocking if applicable.
Wave 9:
Guess the food on the 30s healer spawn. 2nd call target first 2 healers to force out reserve spawns on time. Repoison anything ticking a 3. Restock after the first reserve spawns. Fill vial before restocking if applicable.
Wave 10:
Same as 7.
When restocking, take one of each of the potential 3rd call food before continuing to stock the called food.
Before getting into codes it's important to know the basics of healers. As you can see in the table below the number of healers, reserves and the hitpoints of each healer changes each wave, so our codes must also.
Healers per wave:
Spawns
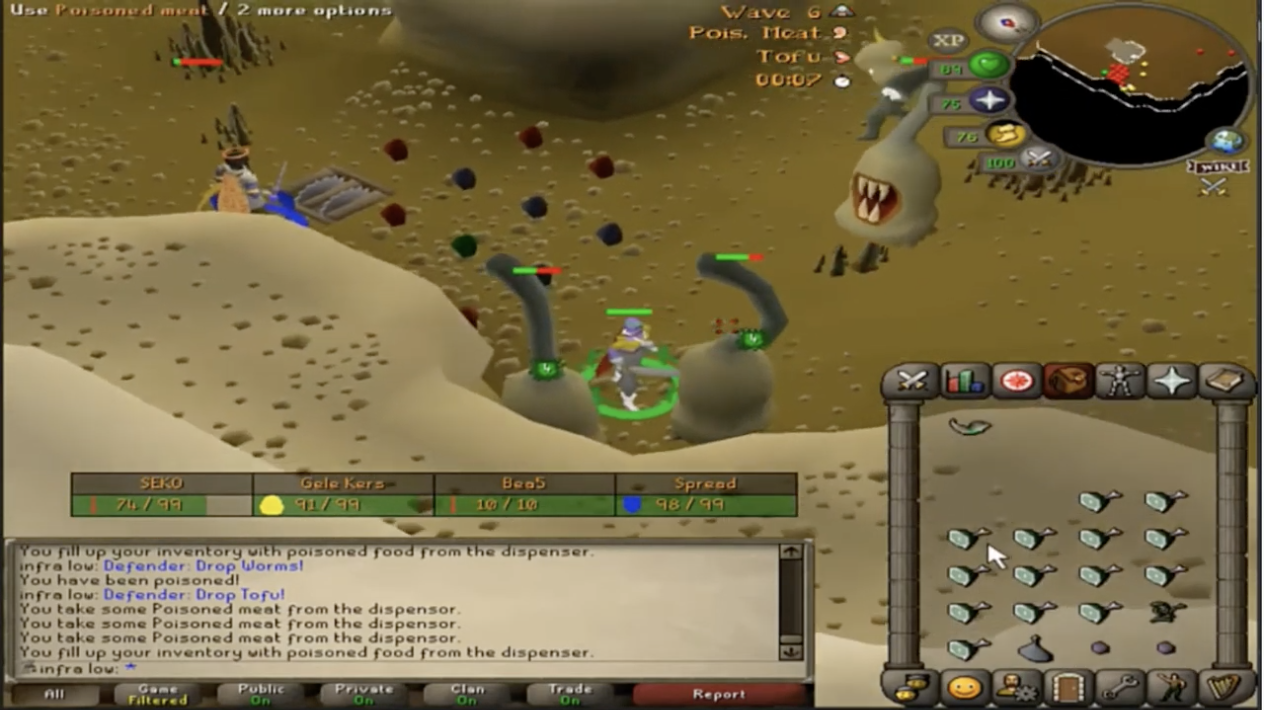
Penance healers will spawn every 6 seconds until all the healers per wave are out, on waves 3 - 10 there are healers that will only come out once another healer has died, these are known as reserves. Reserves will also spawn at 6 second intervals. Therefore, the purpose of healer codes is to efficiently force these reserve healers out so they can spawn at or just before a 6 second interval whilst saving as much food as you can to minimise time restocking.
The healer mechanics for forcing a reserve healer spawn follow an order of operation which are as follows.
1. The first check is whether the healer can tick a poison - if it's poisoned it will do so.
2. The second check is if a reserve can actually spawn - if a healer is already dead or if it ticks poison to die on the same tick as a reserve spawn then a reserve will spawn.
3. The last check is any poison from the food that a player applied.
What this means: If a healer dies from a poison tick at the same time as a reserve can spawn the reserve will spawn but if you attempt to manually poison a healer on the tick a reserve will spawn it will not come out and instead spawn at the next interval.
Healers per wave:
Spawns
Penance healers will spawn every 6 seconds until all the healers per wave are out, on waves 3 - 10 there are healers that will only come out once another healer has died, these are known as reserves. Reserves will also spawn at 6 second intervals. Therefore, the purpose of healer codes is to efficiently force these reserve healers out so they can spawn at or just before a 6 second interval whilst saving as much food as you can to minimise time restocking.
The healer mechanics for forcing a reserve healer spawn follow an order of operation which are as follows.
1. The first check is whether the healer can tick a poison - if it's poisoned it will do so.
2. The second check is if a reserve can actually spawn - if a healer is already dead or if it ticks poison to die on the same tick as a reserve spawn then a reserve will spawn.
3. The last check is any poison from the food that a player applied.
What this means: If a healer dies from a poison tick at the same time as a reserve can spawn the reserve will spawn but if you attempt to manually poison a healer on the tick a reserve will spawn it will not come out and instead spawn at the next interval.
After being poisoned, Penance Healers (except the first) will tick poison every 3 seconds; This is why all heal codes will finish at 3 second intervals and all repoison timings will too. It also means that if you are poisoning a healer after 3 seconds of a healer spawning you will lose a poison tick.
The first healer operates differently to the others because it's not poisoned within 3 seconds of spawning, it will tick poison 3 seconds after you first poison it. Also, this may become true for any other healer too if you are late to poison it and may require you to use an extra food to get the desired reserve timings or finish.
The codes themselves vary throughout waves, but a general rule for most codes is if the spread is bad you can exchange the coding for the first and second healer to force the reserve spawn. This is because Henke's spacing calculator tool that is used to help create codes starts from a 12 second spawn time therefore the spacing for the first and second healer both starts at 12 seconds even though the 1st healer spawns at 6 seconds, this is due to the time it takes running up to reach the healers. For example if the code is 1-5-1-1 you can adapt and make it 5-1-1-1, simply swapping the first two healers. More on codes and adapting later.
A healer poisoned with a single food will tick a "4" 5x before it starts ticking "3"'s. If the code requires the first or second healer to 'not tick a 3' it's useful to know that you have 12-15 seconds to repoison it. This is the reasoning behind "spacing" - it allows healers to be killed with as little food as possible within the target time using well timed repoisons. 66 seconds after the initial poison is applied the healer will become unpoisoned.
Including the initial 4 poison from the first food you apply a single food will total 54 damage.
Below is an example of the poison ticks for the second healer.
Therefore, with the exception of reserves that will spawn while you're restocking, all healer codes are written assuming that you are poisoning healers within 3 seconds of them spawning and you are poisoning the first healer on/or ideally before the tick that the 2nd healer spawns.
The codes themselves vary throughout waves, but a general rule for most codes is if the spread is bad you can exchange the coding for the first and second healer to force the reserve spawn. This is because Henke's spacing calculator tool that is used to help create codes starts from a 12 second spawn time therefore the spacing for the first and second healer both starts at 12 seconds even though the 1st healer spawns at 6 seconds, this is due to the time it takes running up to reach the healers. For example if the code is 1-5-1-1 you can adapt and make it 5-1-1-1, simply swapping the first two healers. More on codes and adapting later.
A healer poisoned with a single food will tick a "4" 5x before it starts ticking "3"'s. If the code requires the first or second healer to 'not tick a 3' it's useful to know that you have 12-15 seconds to repoison it. This is the reasoning behind "spacing" - it allows healers to be killed with as little food as possible within the target time using well timed repoisons. 66 seconds after the initial poison is applied the healer will become unpoisoned.
Including the initial 4 poison from the first food you apply a single food will total 54 damage.
Below is an example of the poison ticks for the second healer.
Penance Healers, after spawning, will target any visible player. It will chase this player until it reaches them, poisoning them for 2hp in the process. After this, it will wander for a short duration of time before targeting any visible Penance Runner. It will then chase the Runner and heal it to full health. It will continue to alternate between targeting players and Runners. If there are no Runners in sight, the Penance Healer will wander randomly for the rest of the wave.
This is important because it is the backbone of good positioning. On later rounds when you run up to poison the first healers, you want to be as far east as you can near the eastern wall in the north eastern corner. This helps you to pin healers against the eastern wall limiting their movements and delaying the time it takes them to target a runner, helping you to get more food off with more difficult codes. It also allows you to stay close to the healer spawn to de-aggro and poison the new spawns as they spawn; helping with the healer spread and potentially reluring them back east after they target a runner. This can hinder us too, especially if you restock at the wrong time (when a healer is spawning). This limits the defenders ability to lure the healers causing you to chase full hp healers around the map and have late repoisons on other reserves and healers.
We can also use the healers targeting the defender to our advantage by body blocking to trap penance healers against the wall - something that is extremely useful on Waves 4, 5 & 10 or the defender can split penance healers using you as a block.
Approach
The approach is important because firstly, it'll allow you to limit the chances of bad healer spreads and therefore, make it easier to consistently achieve more difficult codes.
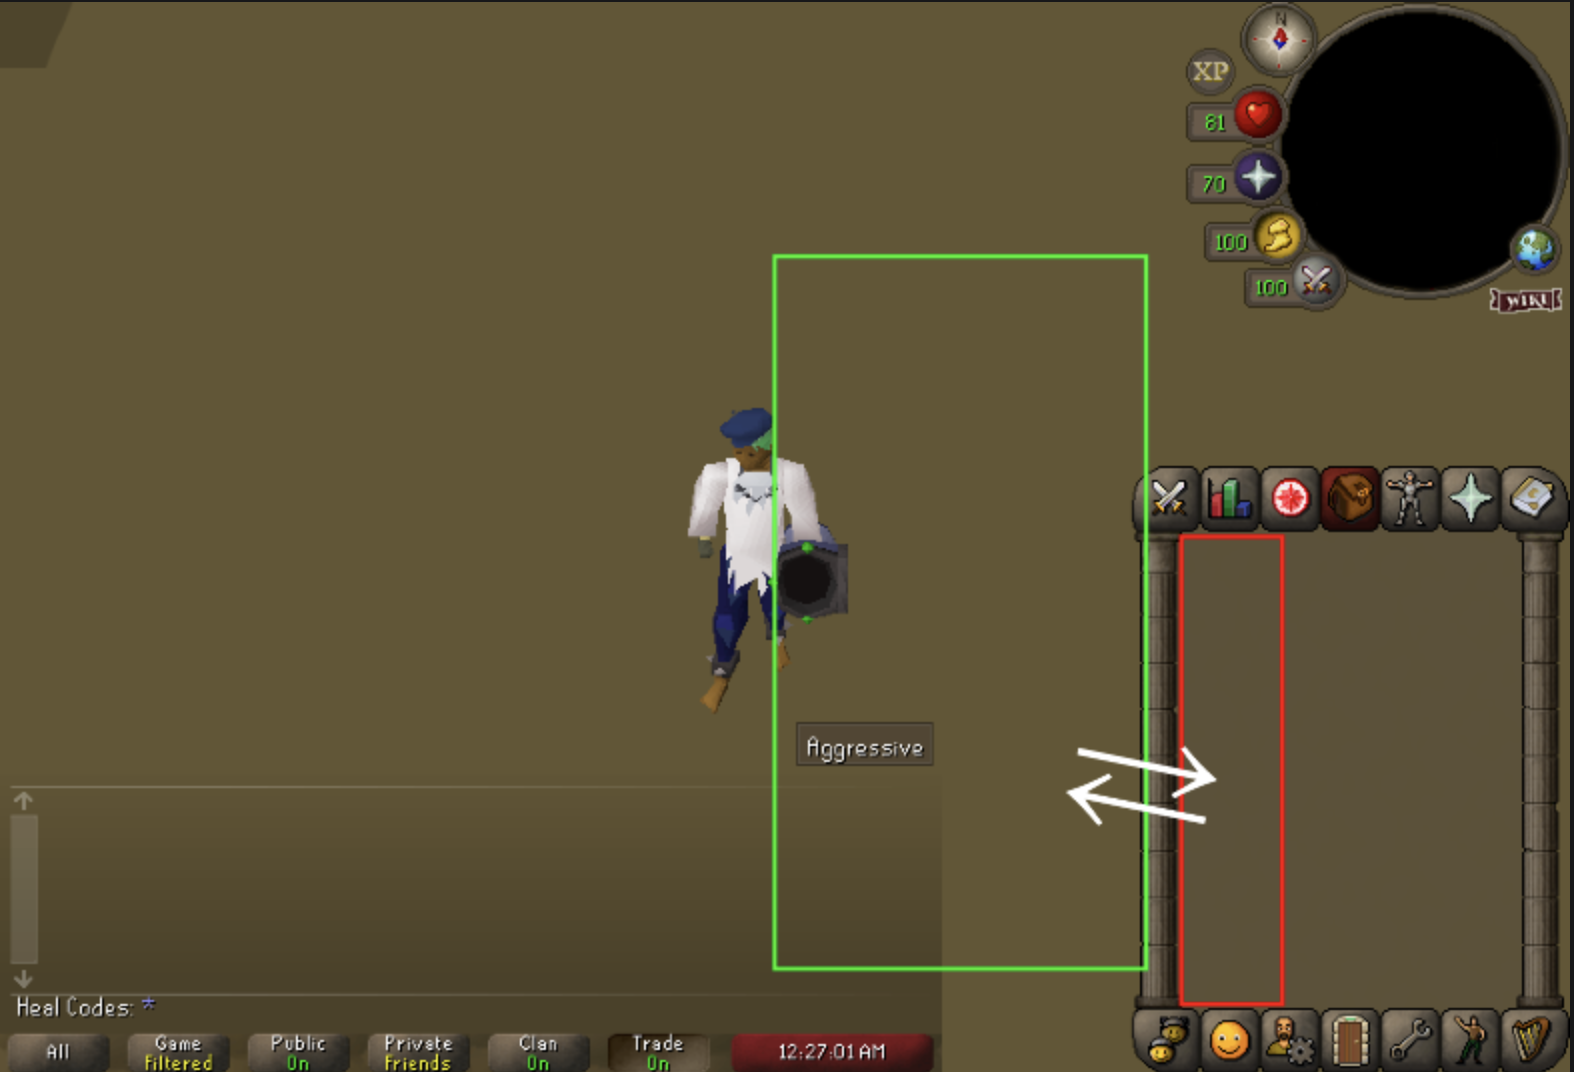
For the majority of codes the second penance healer is the "spam" healer in which you'll be using the majority of your food. When you're approaching you should stay as far east as you can forcing the second healer against the wall. With the wall blocking the healer from moving any further east and yourself body blocking from the south (tile 2) you'll limit 50% of the penance healer's potential movements keeping it stationary for longer. In the process you'll lessen the chance of the penance healer going south past the trap, lessening the spread. If it moves north then you're going to be closer to the 3rd healer's spawn so this is also beneficial as you'll easily be able to poison it within 3 seconds of it spawning. Note: Penance healers have a tendancy for east-west movements.
The other reason you want to stay east is that you'll be delaying the time between the first healers targeting a penance runner. As mentioned above penance healers will target a player, a penance runner and then a player and so on. Staying east will lessen the prevalance of the penance healers targeting a west runner which has the potential to target an attacker or collector in the A/C block. Ideally the penance healers will instead target you and remain in a tight spread.
Healer Slide
Click on tile 1 then use a food on the healer while you're still running up and you'll slide east inline with tile 2 (note: if you click too high up you wont move east). You can then either manually move up to tile 2 or use a food on the second healer which will move you up to tile 2 automatically. Moving to tile two will allow you to trap the second healer against the wall north of you. Spam down the second healer before moving up near tile 3 to be ready for the 3rd healer's spawn at 18seconds.
Alternatively you can poison the first healer without sliding and just manually move to tile 2.
Healer Slide Example
Positioning throughout the wave
Staying east is something that you should not just be doing on the approach, but throughout the wave. The areas highlighted below are the most optimal places to be positioned thoughout the end of the first call and throughout the second call. Staying within the green portion will prevent you from bumping or blocking penance runners making it more difficult for the defender to multi kill them. Standing north of the trap away from the defender as much as you can helps to separate healers when they target you. This is especially useful on waves 8 and 9 where large groups of penance healers will usually be around the defender as they target the stacked runners waiting to be multikilled. Identifing which healer to target in a stack of moving healers can be difficult at times even for experienced healers so separating them as much as you can is extremely beneficial.
If you do need to repoison a healer that is around the trap be extremely cautious not to phase through the defender, this can cause a myriad of issues such as causing runners to crash, the defender having to run to get more logs and also miss important healer lures, all of which may extend wave times and make it more difficult for you.
It's not recommended to go beyond the red line during the first 2 calls, if you see healer targetting the collector or attacker it is best to attempt to repoison it before it passes the hammer, otherwise just let it go and deal with it later - it's not worth losing DPS on multiple healers and risking late poisons on reserves for the sake of chasing one healer. If you move too far west you risk pulling fighters and rangers from the A/C block, slowing the attacker down and also making it more difficult for you as a healer because you'll now have to navigate between more NPCs.
The approach is important because firstly, it'll allow you to limit the chances of bad healer spreads and therefore, make it easier to consistently achieve more difficult codes.
For the majority of codes the second penance healer is the "spam" healer in which you'll be using the majority of your food. When you're approaching you should stay as far east as you can forcing the second healer against the wall. With the wall blocking the healer from moving any further east and yourself body blocking from the south (tile 2) you'll limit 50% of the penance healer's potential movements keeping it stationary for longer. In the process you'll lessen the chance of the penance healer going south past the trap, lessening the spread. If it moves north then you're going to be closer to the 3rd healer's spawn so this is also beneficial as you'll easily be able to poison it within 3 seconds of it spawning. Note: Penance healers have a tendancy for east-west movements.
The other reason you want to stay east is that you'll be delaying the time between the first healers targeting a penance runner. As mentioned above penance healers will target a player, a penance runner and then a player and so on. Staying east will lessen the prevalance of the penance healers targeting a west runner which has the potential to target an attacker or collector in the A/C block. Ideally the penance healers will instead target you and remain in a tight spread.
Healer Slide
Click on tile 1 then use a food on the healer while you're still running up and you'll slide east inline with tile 2 (note: if you click too high up you wont move east). You can then either manually move up to tile 2 or use a food on the second healer which will move you up to tile 2 automatically. Moving to tile two will allow you to trap the second healer against the wall north of you. Spam down the second healer before moving up near tile 3 to be ready for the 3rd healer's spawn at 18seconds.
Alternatively you can poison the first healer without sliding and just manually move to tile 2.
Healer Slide Example
Positioning throughout the wave
Staying east is something that you should not just be doing on the approach, but throughout the wave. The areas highlighted below are the most optimal places to be positioned thoughout the end of the first call and throughout the second call. Staying within the green portion will prevent you from bumping or blocking penance runners making it more difficult for the defender to multi kill them. Standing north of the trap away from the defender as much as you can helps to separate healers when they target you. This is especially useful on waves 8 and 9 where large groups of penance healers will usually be around the defender as they target the stacked runners waiting to be multikilled. Identifing which healer to target in a stack of moving healers can be difficult at times even for experienced healers so separating them as much as you can is extremely beneficial.
If you do need to repoison a healer that is around the trap be extremely cautious not to phase through the defender, this can cause a myriad of issues such as causing runners to crash, the defender having to run to get more logs and also miss important healer lures, all of which may extend wave times and make it more difficult for you.
It's not recommended to go beyond the red line during the first 2 calls, if you see healer targetting the collector or attacker it is best to attempt to repoison it before it passes the hammer, otherwise just let it go and deal with it later - it's not worth losing DPS on multiple healers and risking late poisons on reserves for the sake of chasing one healer. If you move too far west you risk pulling fighters and rangers from the A/C block, slowing the attacker down and also making it more difficult for you as a healer because you'll now have to navigate between more NPCs.
Positioning on wave 10 follows the same principles as on waves 1-9 except the biggest change here is that the healer and runner spawns are switched around so you don't have the luxury of the walls to block healers against and the runners forcing healers back east. There is also a greater distance to cover with the trap being further away from the healer spawn which you should account for.
First call
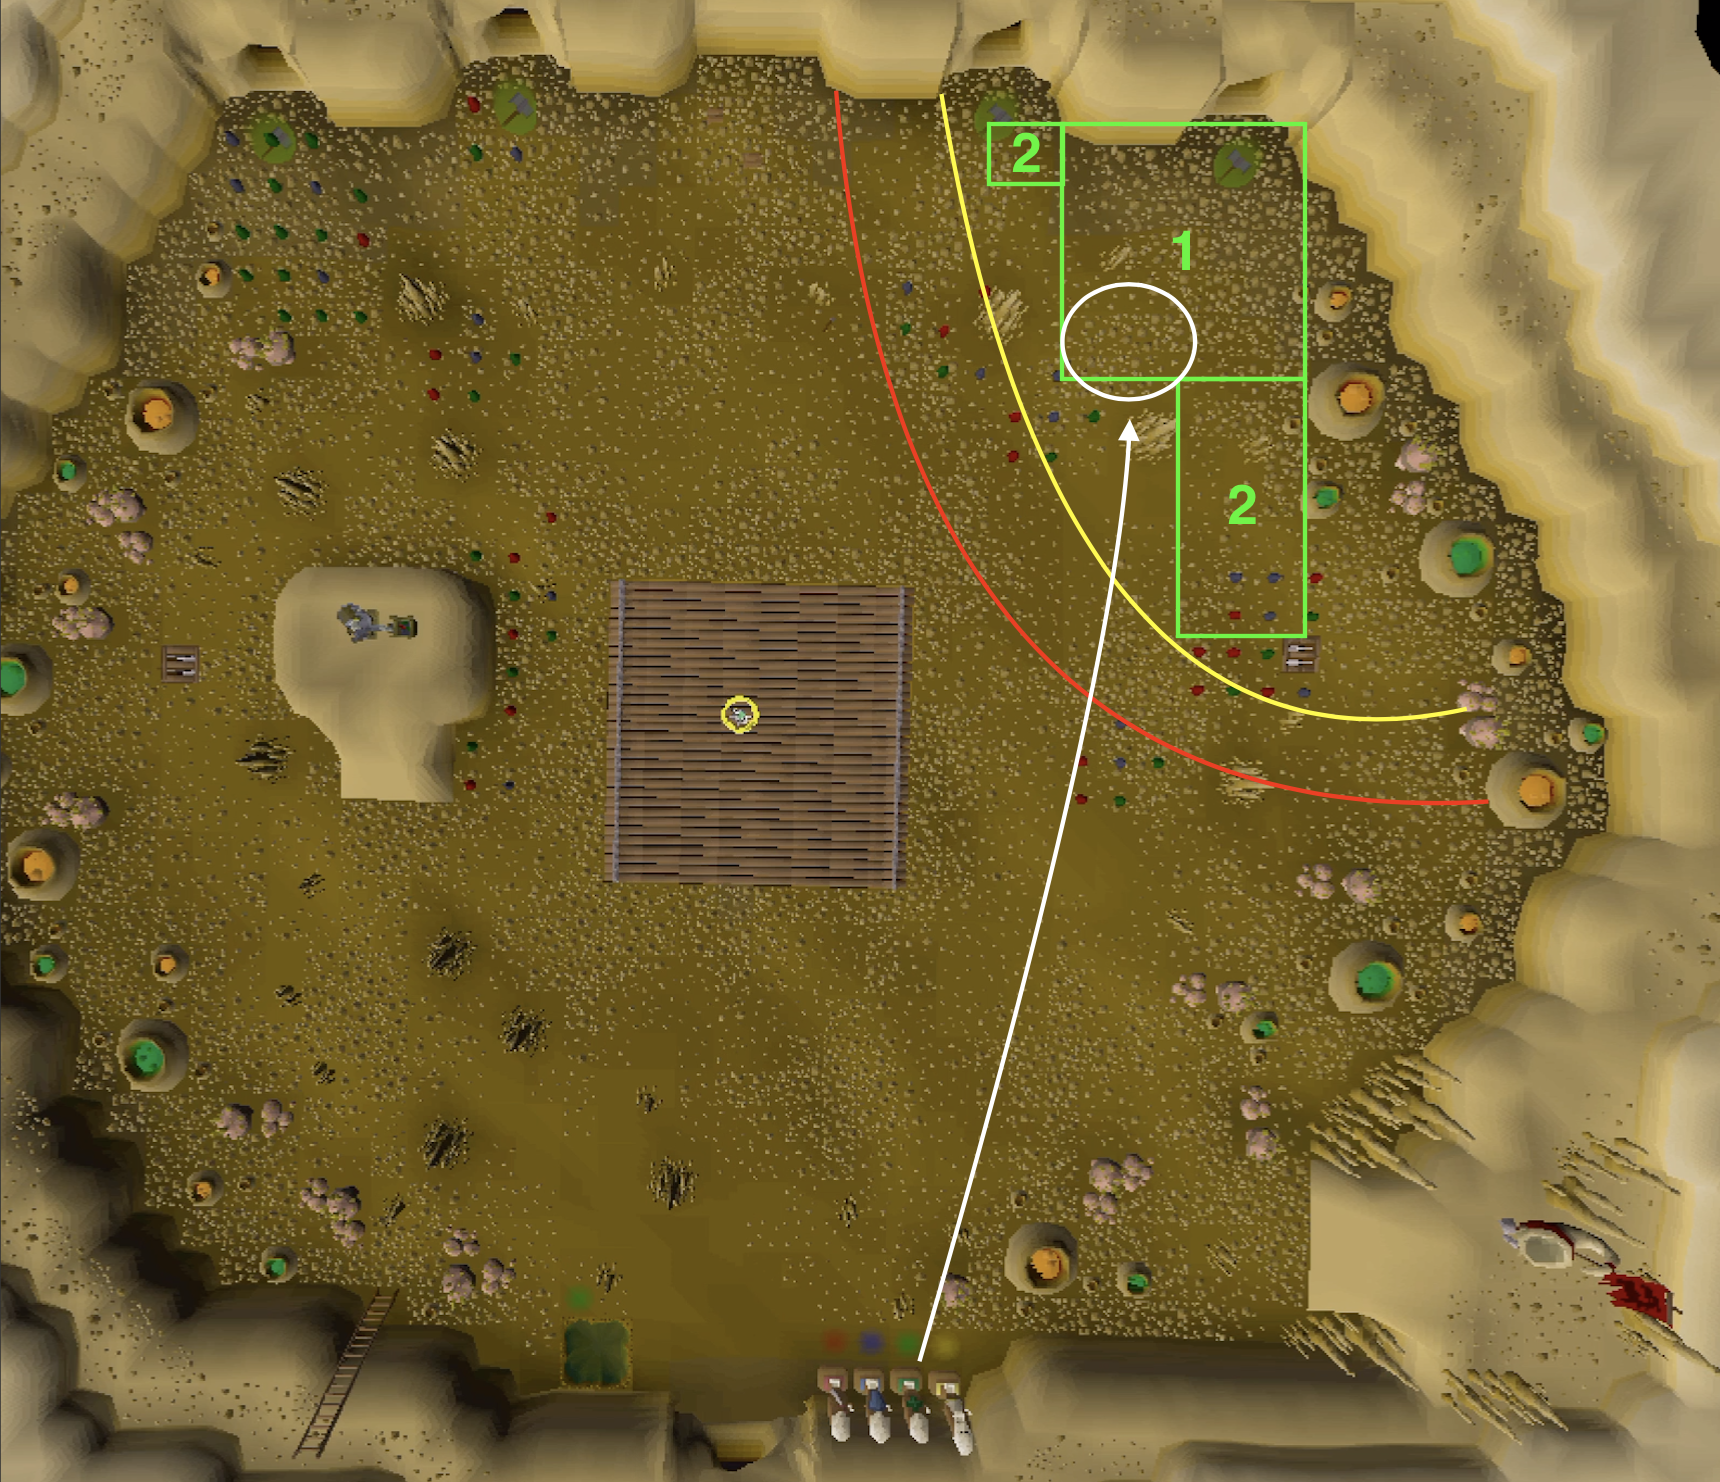
When approaching healers you should be aiming to poison the first healer above the stalagmite - indicated by the white circle in the picture below. The zone labelled 1 is ideally where you want to be keeping healers during the first call. Zone 1 is where you want be when poisoning the first two healers as it's close to the healer cave for the new spawning healers and within target range of the runners.
To finish the first call code for repoisons you may need to move beyond this especially into southern 2 zone as this is where the runners will take them. You should make sure healers that the thrid and fourth healers have spawned before heading south as it's likely they will come back up to you as they target yourself or the defender. During the 2nd call ideally you want to be repoisoning healers between zones 1 and 2 but may need to venture further. Ideally you shouldn't chase healers beyond the red line during the first call unless absolutely necessary as it'll worsen your spread.
Reserves
You can body block new reserves trapping them against the eastern wall of the healer spawn. This is demonstrated below in Technique - Body Blocking.
Note: Wave 10 is notorious for bad spreads, more so than any other wave so positioning and spreads aren't always as straight forward as the above makes it seem. staying within the green zones as much as possible will help however.
First call
When approaching healers you should be aiming to poison the first healer above the stalagmite - indicated by the white circle in the picture below. The zone labelled 1 is ideally where you want to be keeping healers during the first call. Zone 1 is where you want be when poisoning the first two healers as it's close to the healer cave for the new spawning healers and within target range of the runners.
To finish the first call code for repoisons you may need to move beyond this especially into southern 2 zone as this is where the runners will take them. You should make sure healers that the thrid and fourth healers have spawned before heading south as it's likely they will come back up to you as they target yourself or the defender. During the 2nd call ideally you want to be repoisoning healers between zones 1 and 2 but may need to venture further. Ideally you shouldn't chase healers beyond the red line during the first call unless absolutely necessary as it'll worsen your spread.
Reserves
You can body block new reserves trapping them against the eastern wall of the healer spawn. This is demonstrated below in Technique - Body Blocking.
Note: Wave 10 is notorious for bad spreads, more so than any other wave so positioning and spreads aren't always as straight forward as the above makes it seem. staying within the green zones as much as possible will help however.
Basics of body blocking
Before starting on when to block it's important to understand that when a player moves onto a tile that tile becomes solid, and an NPC is unable to pass through it. If another player phases through the player, the tile is no longer solid and must move off and back onto the tile to make it solid again. This is the core mechanics of the attacker, collector and defender roles and is the reason you should be cautious moving around the defender. Do not phase through the defender. We can also use these mechanics as healer to our advantage.
Blocking runners
In leeches the collector will be required to collect eggs to make eggcount, therefore it's up to the healer and defender to block west runners to speed up the early waves.
It's required by the healer to block the last runner on waves 2 and 3.
The last runner on:
- Wave 2 will spawn at 24s or 30s if late.
- Wave 3 will spawn at 30s or 36s if late.
- Extra: if you notice the defender miss the multi-kill on no-log waves (4 & 5) stand north of the trap on the food stack while they go and get logs, this helps to prevent the remaining runner(s) from chomping all of the remaining good food and crashing.
Optional: you can also block the last runner on wave 4 to help the defender but this isn't required, only do this if you can still make it back to body block the last healer - this is more important.
Example of blocking the last runner west on wave 3:
Note: You can block within 5 tiles of the runner spawn so if you're late to block the runner and can't block next to the runner spawn for any reason then you can move anywhere between these 2 runners or where the west runner is in this picture on the highlighted tile.
Bumping Runners: Optional
This isn't required but it's something that can help out your defender. During the early waves 1-4 if the first runner is east the defender must bump the runner one tick to prevent the second runner from crashing. As healer you can assist them in this by standing along the path of the east runner, this way the defender can focus on blocking the second runner from going west and it may help if the defender is too slow and misses the bump. This is also a good position to be in to poison the second healer. Note: if on wave 1 the first two runners are both east and you notice the defender blocking may not make it back to the trap in time you can stand on the food as E-E runners need to be multi'd for a 30second wave end, you can either wait for the defender to do this by them phasing you, or you can do it yourself if you know the multi timing.
Example of bumping the first runner east:
Blocking Healers
Wall trap:
On waves 4 & 5 you can trap the last healer against the wall if it targets the defender. You'll need to be standing south east of the healer spawn and poison it 1 tick after it spawns to trap it against the wall.
This is essential on these no-log waves as it helps to spam down the last healer and also keeps you from interfering with the defender in the event of an east runner.
Example of 4 & 5 wall trap:
Body Block - Wall block
You have already seen 1 example of the body block above in Poisitoning waves 1- 9 where you block the 2nd healer against the wall. The example below is a repeat of this, so you can skip it if you've already watched it. This spot can be used on later waves and is especially useful on double overstock wave 7 to prevent the healer reserve that spawns at 54 seconds from stacking ontop of the 48 reserve.
Healer Slide example
Wall block on Wave 10:
Body blocking Wave 6 (Wall block and body block)
Wave 6 involves 2 different types of blocking that is extremely useful. As healer you should run back and poison reserves first if you can but it's essential that you're blocking the first healer reserve before or as the second healer reserve spawns. Trapping the first reserve in the alcove allows the defender to repair the trap and kill the last runners. If the last reserve targets the defender it also allows them to take advantage of you being solid to split the healers on you.
Wave 6 overstock example:
Guessing food
On waves 8 & 9 and during certain codes you'll be faced with reserve healers or repoisons that need to be poisoned within 3 seconds. In these circumstances, it's important to poison healers as soon possible and waiting for the defender to call wastes time. Since you can use 4 incorrect food on a healer before you recieve a -1 penalty to points there is no reason not to guess food.
Example: Guess the call by using both possible food on the 30s healer then call for the defender.
Preloading repoisons
A useful way to help targetting healers before they slide across each other or stack is to "preload" the next poison. As shown below, you poison the newly spawned healer and before the poison lands right click to use the next food on the healer you want to target, this way even if the healers stack you can easily target the correct penance healer without thinking. As soon as you see the poison-splat you can poison the next healer.
Targetting Stacked Healers
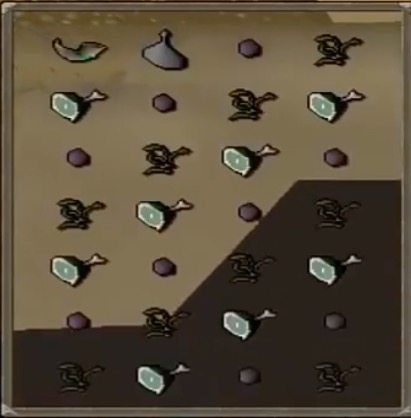
Repoisoning the correct healer and dealing with stacked healers is an issue that a lot of new healers face and struggle with. Repoisoning the wrong healer can lead to a lack of food for another and incidentally cause later wave times. However, there is some consistency to the order of which the healers are stacked. If you have a moving stack of healers then they will show in descending order of 4, 3, 2, 1 with the newest healer on top.
If the penance healers are stacked and are static then the order will change to 1, 4, 3, 2, with the oldest healer being on top and the newest healer being second in the stack when you right click. This patterns only conforms if the healers are perfectly stacked on top of each other, because if one is slightly in-front of the other it will come first therefore is only usually relevant for healers that are lured.
This can be pretty hard to manipulate in real time but the easiest way to see which healer is on top is by looking at the health bars above their head. There will be one health bar "bouncing". The healer with the bouncing health bar will be the top healer in the right click menu, as it will move with the visible healer's movement pattern. The next health bar you can see is the 2nd healer in the right click menu.
Example: As you can see here the healer with the "bouncing" health bar has less health so I poison the second healer in the right click menu in the right click menu instead.
On waves 8 & 9 and during certain codes you'll be faced with reserve healers or repoisons that need to be poisoned within 3 seconds. In these circumstances, it's important to poison healers as soon possible and waiting for the defender to call wastes time. Since you can use 4 incorrect food on a healer before you recieve a -1 penalty to points there is no reason not to guess food.
Example: Guess the call by using both possible food on the 30s healer then call for the defender.
Preloading repoisons
A useful way to help targetting healers before they slide across each other or stack is to "preload" the next poison. As shown below, you poison the newly spawned healer and before the poison lands right click to use the next food on the healer you want to target, this way even if the healers stack you can easily target the correct penance healer without thinking. As soon as you see the poison-splat you can poison the next healer.
Targetting Stacked Healers
Repoisoning the correct healer and dealing with stacked healers is an issue that a lot of new healers face and struggle with. Repoisoning the wrong healer can lead to a lack of food for another and incidentally cause later wave times. However, there is some consistency to the order of which the healers are stacked. If you have a moving stack of healers then they will show in descending order of 4, 3, 2, 1 with the newest healer on top.
If the penance healers are stacked and are static then the order will change to 1, 4, 3, 2, with the oldest healer being on top and the newest healer being second in the stack when you right click. This patterns only conforms if the healers are perfectly stacked on top of each other, because if one is slightly in-front of the other it will come first therefore is only usually relevant for healers that are lured.
Note: The stacks mentioned above are all dependent on the order you render the healers in and before restocking that would usually equate to the order they spawn in. If you move outside of the healers 8x8 target range and you return from the dispenser, the order can potentially get mixed as they will be then ordered by PID of when you render them which may differ from their spawn order.
This can be pretty hard to manipulate in real time but the easiest way to see which healer is on top is by looking at the health bars above their head. There will be one health bar "bouncing". The healer with the bouncing health bar will be the top healer in the right click menu, as it will move with the visible healer's movement pattern. The next health bar you can see is the 2nd healer in the right click menu.
Example: As you can see here the healer with the "bouncing" health bar has less health so I poison the second healer in the right click menu in the right click menu instead.
Screen Size and Camera Angles
Screen size comes down to personal preference as healers screen layouts all differ, play around with it and find something that works for you. In general most healers have certain things in common, they keep their screen size relatively small and use the resizeable screen setting. This allows a gap between the chatbox and the inventory to make it easier to spam down healers. The screensize below is what is most commonly recommended.
As you can see in all the examples below the healer has adapted their camera angle to place the healer as close to their inventory as they can. Spamming down healers comes down to muscle memory, the more consistent you are with keeping "spam" healers in positions highlighted in the greenbox below the more consistent and faster you'll become. You may notice from the video examples in the Leeching scenarios (mintos's training program project) that the healer moves their inventory to reposition the food to the left-hand side of their inventory, again having food in a similar place each time will help aid the muscle memory of spamming down healers. Moving the food to the left-hand side of your inventory whilst you're approaching the healers may also help with your consistency, as the food will consistently be in the same place for spam healers. Consistency to build your muscle memory is key in becoming a consistently good healer.
Examples of different screen sizes and layouts below.
Note: The first two can be used on the default client, the 3rd and 4th can be achieved by using runelite's stretched mode feature. Which will also allow you to make your inventory bigger and therefore the click boxes of the food aswell.
Quick note on Camera Zoom
In certain circumstances zooming in and out can be beneficial, for example zooming in on a "spam" healer allows you to more accurately, click on the healer and limits the distance the mouse has to travel; however, be aware that this in turn limits your field of view and isn't recommended during the first 2 calls, or if you still need to repoison healers.
Third Party Clients - Runelite
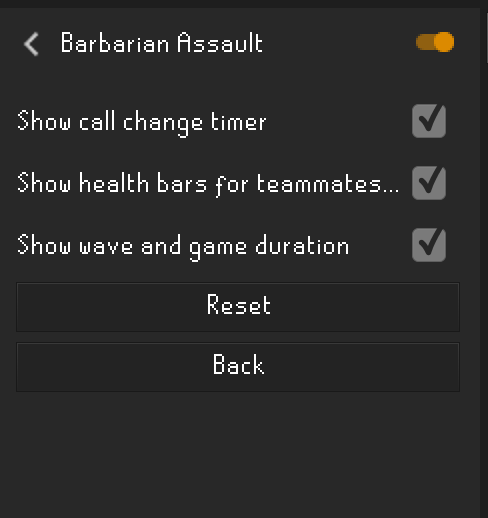
One of the most useful tools for a healer is the barbarian assault plugin on runelite, this has been approved by Jagex and won't put you at risk of being banned.
The wave end duration allows you to see your wave end times to get a gauge of your application of the codes.
The call change timer is perhaps the most useful plugin, this allows you to more accurately time repoisons, and can be used to gauge healer and reserve spawns. Alternatively you can count poison ticks or use external timers, however the runelite timer is highly recommended.
Screen size comes down to personal preference as healers screen layouts all differ, play around with it and find something that works for you. In general most healers have certain things in common, they keep their screen size relatively small and use the resizeable screen setting. This allows a gap between the chatbox and the inventory to make it easier to spam down healers. The screensize below is what is most commonly recommended.
As you can see in all the examples below the healer has adapted their camera angle to place the healer as close to their inventory as they can. Spamming down healers comes down to muscle memory, the more consistent you are with keeping "spam" healers in positions highlighted in the greenbox below the more consistent and faster you'll become. You may notice from the video examples in the Leeching scenarios (mintos's training program project) that the healer moves their inventory to reposition the food to the left-hand side of their inventory, again having food in a similar place each time will help aid the muscle memory of spamming down healers. Moving the food to the left-hand side of your inventory whilst you're approaching the healers may also help with your consistency, as the food will consistently be in the same place for spam healers. Consistency to build your muscle memory is key in becoming a consistently good healer.
Examples of different screen sizes and layouts below.
Note: The first two can be used on the default client, the 3rd and 4th can be achieved by using runelite's stretched mode feature. Which will also allow you to make your inventory bigger and therefore the click boxes of the food aswell.
Quick note on Camera Zoom
In certain circumstances zooming in and out can be beneficial, for example zooming in on a "spam" healer allows you to more accurately, click on the healer and limits the distance the mouse has to travel; however, be aware that this in turn limits your field of view and isn't recommended during the first 2 calls, or if you still need to repoison healers.
Third Party Clients - Runelite
One of the most useful tools for a healer is the barbarian assault plugin on runelite, this has been approved by Jagex and won't put you at risk of being banned.
The wave end duration allows you to see your wave end times to get a gauge of your application of the codes.
The call change timer is perhaps the most useful plugin, this allows you to more accurately time repoisons, and can be used to gauge healer and reserve spawns. Alternatively you can count poison ticks or use external timers, however the runelite timer is highly recommended.
Unlike fun runs, healing your teammates is essential to leeches.
Vialling is required in leeches on rounds where the client is healer in order to hit the point target, vialling refers to the healing of your teammates, and you should be using all 4 doses of your healing vial if possible. There are two options on when to vial, you can vial on waves 1 and 2 or waves 8 and 9.
In trials vialling is required on waves 8 & 9, which is also the classic option in leeches too.
Once ranked if the collector (and/or defender) bring divine potions to lower their hit-points on waves 1 and 2 you can vial then instead of 8-9 to speed up the later rounds.
The codes for vialling 1-2 are different to normal, due to the time lost filling the vial so you will be required to use more food to finish within the target time. On waves 8 and 9 the codes don’t change and the collector and attacker should come east during the 3rd call for you to vial them so you can finish the healers faster.
When vialling on waves 8 and 9 you should fill your vial before restocking and it's important that when you restock, you account for the extra time it takes to vial your teammates. In general you should be finishing all of the called food in your inventory, you can choose to use all of the food and then vial the attacker and collector while the last healers are ticking down, or if the attacker and collector are still east, you can leave one healer at low health and finish it off during the 4th call after you have finished vialling. It's important to vial as much of your team's hit-points as possible, so make sure that if you are going to finish before the attacker and defender, you are able to vial them sufficiently before the wave end.
Although uncommon with experienced solo attackers, if you notice the Attacker has very low hitpoints on waves 8 & 9 or another member of the team is low health, poisoned and is likely to die then you should also fill your vial and heal them, even if it's not a heal round. It's faster to fill a vial than to reset a wave.
If you're new to healer then it's recommended to practice heal in funs, if you have level 5 in at least two roles then you can join Casual BA, if you're looking for healer codes to use in funs then you can check out Casual BA's healer guide section.
The main difference between the codes used in funs and leeches comes down to the difference in the teams. In funs you have the luxury of two attackers that can extend waves, duplicate red eggs and finish quickly to grab healer lures. Due to the nature of leeches, the attacker will not be able to get lures and the collector will not be able to load the cannon on most rounds due to the required eggcount. Therefore, although there is some overlap with certain codes we recommend you learn and use the leech healer codes from our healer guides section. The difference in leech heal codes from fun runs, is that they are aimed at minimising repoisons. They are also aimed at giving the defender the ablilty to lure the last healer while you're restocking on later waves to provide consistency without eggs and call extensions.
Once you're ranked, certain attackers may be able to extend calls for you on certain waves (usually the 3rd call on wave 7/8/9 if required), but you shouldn't rely on this especially if you notice fighters and rangers east. Make sure to let the attacker know before the call change by saying "X", as extentions only work if prayers are queued before the call change.
You may also have eggs during the 3rd call if the client's needs allow it. If eggs are tageting a specific healer then it will require less poison so you can target other healers but eggs are usually of limited effect in leeches in comparison to funs due to less people firing the cannon and the time it takes for the collector to convert and load the cannon. It's usually only expected to have eggs in leeches on wave 10.
During a trial you'll never have eggs or extentions so account for this accordingly.
Regular Stock
Regular stock is when you simply left click the dispenser.
Regular stocking will give you: 9 Tofu, 9 worms and 8 Meat.
Optional: You can alch your horn using the explorers ring to give you 9 Meat.
Regular stock is when you simply left click the dispenser.
Regular stocking will give you: 9 Tofu, 9 worms and 8 Meat.
Optional: You can alch your horn using the explorers ring to give you 9 Meat.
Advantages
- Regular stock codes are simple during the first call as there is less food to be used.
- Eliminates the margin of error from stocking the wrong food.
- It's quick, you don't have to wait for the defenders call and you'll save ticks at the dispenser.
Disadvantages
- Having an easier stock first call means that you'll need to do more work 2nd call with more repoisons.
- Later reserve spawns.
- Having 1 less meat means you'll either need to alch your horn or alter the codes to account for having less food on meat calls.
Single Overstock

Single overstock is where you manually stock the called food once and then left click.
Single overstock will give you 12 of the called food and 7 of the called food.
Single overstock is where you manually stock the called food once and then left click.
Single overstock will give you 12 of the called food and 7 of the called food.
Advantages
- You'll always have the same amount of food so the codes never change.
- Earlier spawn times.
- Less repoisons during the second call.
- When executed properly they allow for faster more consistent wave times.
Disadvantages
- More difficult to execute than regular stock.
- Potential errors from stocking the wrong food.
- Slower to stock than regular stocking so you must be wary of making sure you're not losing too many ticks and being late to poison the first two healers.
Double Overstock
Double overstock is where you manually stock the called food twice and then left click.
Double overstock will give you 16 of the called food if tofu and 5 of the remaining two food or 15 of the called food if worms/meat and 6 tofu and 5 meat/worms.
Advantages
Double overstock is where you manually stock the called food twice and then left click.
Double overstock will give you 16 of the called food if tofu and 5 of the remaining two food or 15 of the called food if worms/meat and 6 tofu and 5 meat/worms.
- Earlier spawn times.
- When executed properly they allow for faster wave times.
Disadvantages
- Is an advanced method that's difficult to execute.
- Potential errors from stocking the wrong food.
- Slower to stock than regular and single overs stocking so you must be wary of making sure you're not loosing too many ticks and being late to poison the first two healers.
13/13 Restock
A 13/13 restock is type of restock used in certain codes on Waves 7 & 8. When manually stocking a type of food you'll receive 5 food, to achieve a 13/13 restock you destroy all but 3 of the remaining food in your inventory and then restock the food of that same type twice, giving you 13 total food. You then manually stock three times the other possible food for the second call. In the example above the second call food was worms, so the 13/13 stock allows the healer to stock 13 of each of the possible food for the third call. Optional: you can use your explorers ring to alch the horn and destroy your vial to 14/14 restock. It's the same method but you keep 4 food instead of 3.
A 13/13 restock is type of restock used in certain codes on Waves 7 & 8. When manually stocking a type of food you'll receive 5 food, to achieve a 13/13 restock you destroy all but 3 of the remaining food in your inventory and then restock the food of that same type twice, giving you 13 total food. You then manually stock three times the other possible food for the second call. In the example above the second call food was worms, so the 13/13 stock allows the healer to stock 13 of each of the possible food for the third call. Optional: you can use your explorers ring to alch the horn and destroy your vial to 14/14 restock. It's the same method but you keep 4 food instead of 3.
Advantages:
- It allows you to restock and leave the dispenser before the call change even happens so you can poison reserves and the spam healer earlier, resulting in faster wave ends with less spam.
Disadvantages:
- You need to be accurate with your codes and leave to restock as soon as you poison the 48s reserve, if you're late to stock (as the call changes then you )
- Limited food so you have to use it wisely and make sure you get it all off during the 3rd call.
Example:
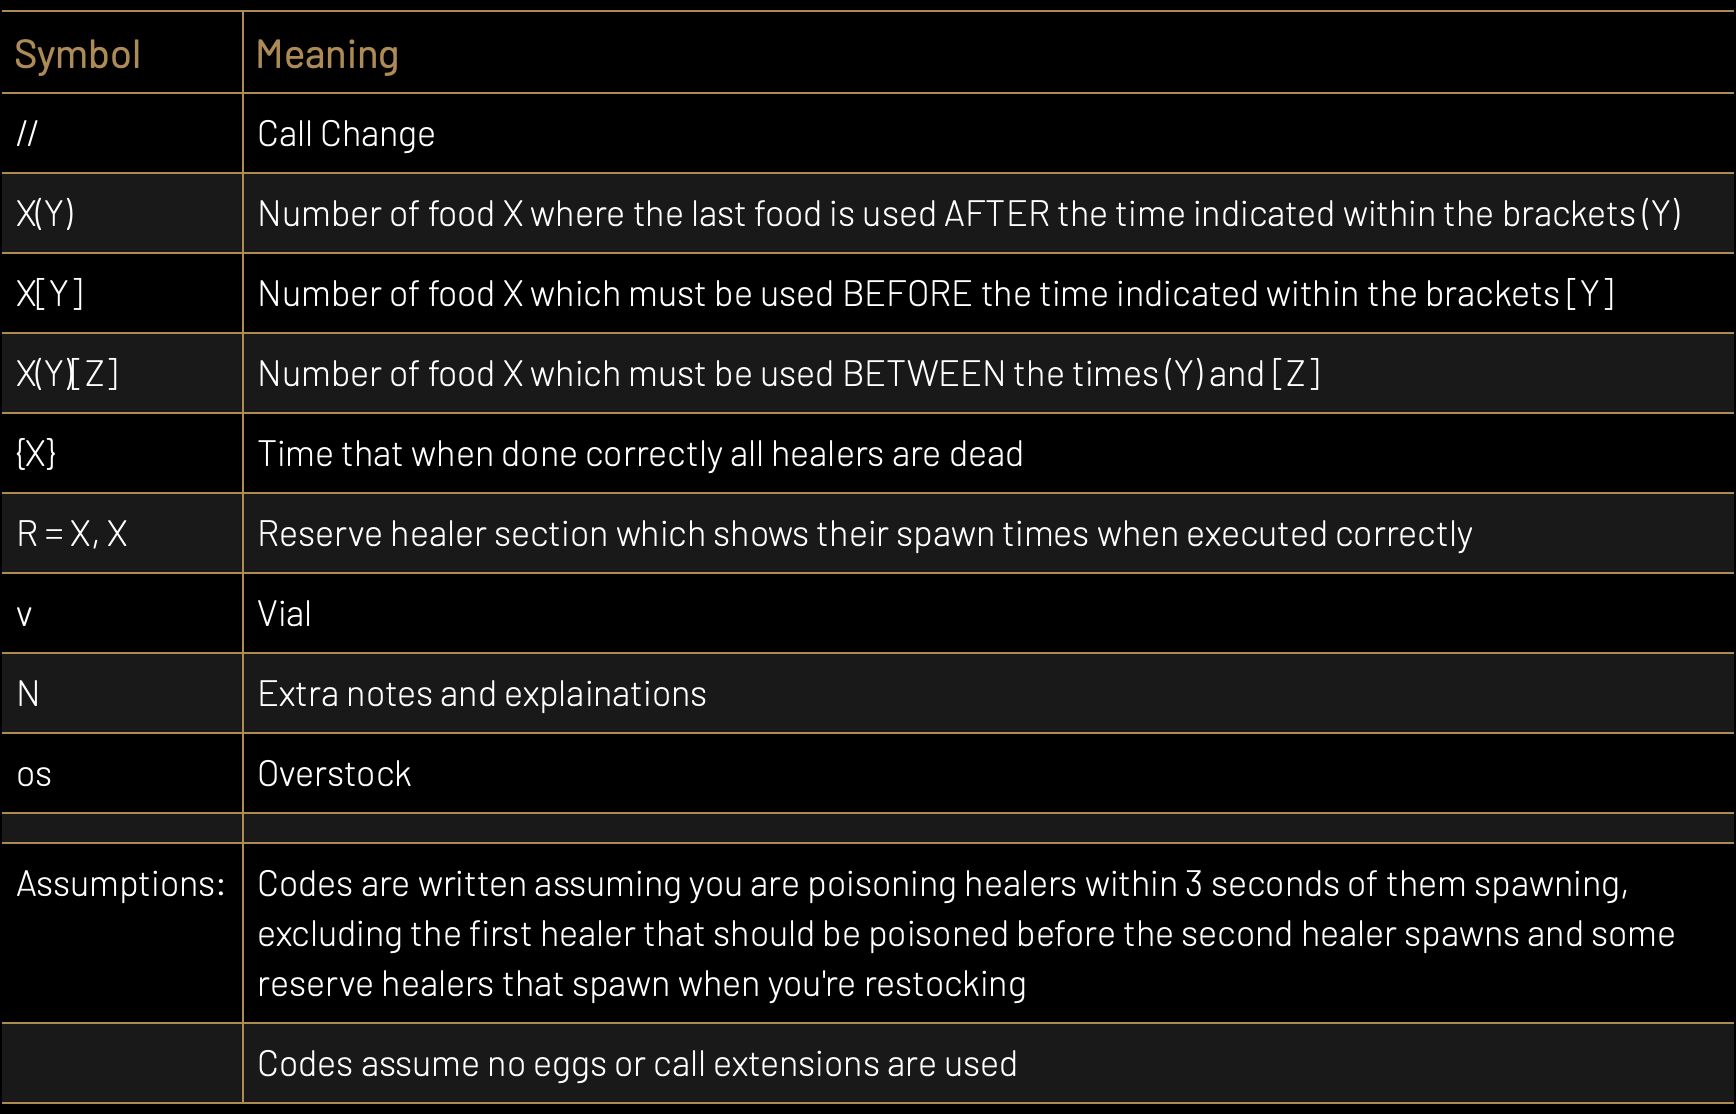
KEY - (I will explain these all below)
The basics of codes
Before we start we'll revisit the table below from earlier in this guide and look at a wave. More specifically Wave 9.
Wave 9: 6 + 2 = 8 (76)
On wave 9 you can see there are 8 total healers with 76 hp each. Of these 8 there are 2 "reserve healers" that will only spawn once one of the first 6 healers have spawned. We know that healers spawn 6 seconds apart starting at 6 seconds therefore only 4 healers will come out during the first call and 2 will come out during the second call.
If I were to use 1 food on each of these healers the code would look like this for the the first call:
1-1-1-1
If i were to continue to the second call and poison the next two healers the code would then be:
1-1-1-1 //
0-0-0-0-1-1
Note that the // = the call change. Since I didn't repoison any of the first 4 healers during the second call they show up as 0's and there are a total of 6 healers now spawned. This code however is impractical because it isn't enough food to kill any of the healers and there are still 2 reserve healers I want to force out, I would also still have food left in my inventory, which is a complete waste.
So let's look at a practical code for wave 9 and break it down.
Regular stock R - 48 66 {96}
1-5/6-1-1 //
2-1/2(33)-1-1-1-1-1
Restock
0-0-0-0-1-2-3-spam
Regular stock:
This is simply the way that you are getting food in your inventory, a regular stock is when you left click the dispenser and it will fill your inventory with the horn, a vial, 9 tofu, 9 worms and 8 meat.
R- 48 66:
These are the expected reserve timings, if you poison the healers in the manner this code states then healers will die before these times and then the reserve healers you expect will spawn at 48 seconds (18 seconds into the second call) and 66 seconds (6 seconds into the third call)
{96}:
If you follow these codes perfectly and the spread is good then this is the time you should expect to finish the entire wave in seconds = 1 minute and 36 seconds.
1-5/6-1-1:
As i noted before you will have 9 of tofu/worms and only 8 meat. Therefore, during the first call you should be poisoning each of the healers once as they spawn except for the 2nd healer in which you should target and use 6 food on it if it's a worm or tofu call or 5 food on it if it's a meat call.
//:
The call change at 30 seconds.
2-1/2(33)-1-1-1-1-1:
Because the first call differs from whether it is a meat call or tofu/worms so does the second. So if the first call is meat then the second healer will require you to use 2 food on the second healer (you can distinguish this because it will have the lowest health out of all the healers). However we can also see (33) next to the 2nd healers poison, what this means is that in order for this healer to die on time, we must place the last food we used on it after 33 seconds. This is referred to as spacing. Now the full spacing of this isn't written but if it was then it would look like this:
2(33)-1/2(33)-1-1(42)-1[33]-1[39]-1[51]
1st healer: 2(33):
We want to get the 2nd reserve healer out at 66 seconds after we have come back from restocking so to do this it requires 3 food total across the first 2 calls. The last food must be placed after 33 seconds for it to die in time.
2nd healer: 1/2(33):
This is the one we focused in the first call and will be easily distinguishable because it will have the lowest health but in order to get our first reserve out at 48 seconds it needs a total of 7 food across the first 2 calls. Since the amount of food we used on it first call is dependant on the type of food we used, we must adapt during the second call. If it was meat during the first call then it needs 2 food. If it was worms or tofu it only needs 1. This healer cannot tick 3s or else you will get a late spawn therefore we must use out last food on it after 33 seconds as well. We know from above that poison ticks every 3 seconds and will tick 4's 5x giving us ~15 seconds of 4s, this is why we poison it after 33 seconds, so it'll tick 4s during the entire 2nd call until it dies.
3rd healer: 1:
We no longer have any reserves we need to force out, because there are only 2 during this wave, so we need to repoison this 3rd healer during the second call but it has until 96 seconds (our ideal wave time) to die. So spacing doesn't matter as long as we repoison it when we see it ticking 3s.
4th healer: 1(42):
The same as above but needs to be repoisoned after 42 seconds, and since we poisoned it during the first call when it spawned then it will start ticking 3s at 42 seconds.
5th healer: 1[33]:
This healer will spawn at 30 seconds on the call change. The squared brackets have a different meaning and they refer to a time that the healer needs to be poisoned before. Because it spawns at 30 seconds and we want to poison it within 3 seconds of it spawning then we need to use 1 food before 33 hence the 1[33].
6th healer: 1[39]:
The same as above but this healer spawns at 36 seconds.
1st reserve at 48 seconds: 1[51]:
The same as above but this is a reserve and it will only spawn at 48 seconds assuming you have poisoned the 2nd healer correctly.
So why don't we write it as 1-5/6-1-1 // 2-1/2(33)-1-1-1-1-1 and not 2(33)-1/2(33)-1-1(42)-1[33]-1[39]-1[51]?
If you haven't gathered by now codes can get pretty complicated and remembering exact repoison timings for every wave isn't an easy task. The easiest way to learn codes is by remembering them in your own terms and remembering certain assumptions for different waves.
Assumptions when healing:
As mentioned above there are certain assumptions we can make in later waves (7-10) to help us simplify, remember and apply codes better when learning.
1. Poison all the penance healers as soon as they spawn, (they spawn every 6 seconds).
2. Repoison anything ticking a 3 during the 2nd call.
3. Use spacing even when there isn't any spacing in the code. We know that we have 5x poison ticks to poison a healer before it ticks a 3 so if we save our last food for the second healer as late in the call as we can then we will have more time in the second call to repoison it.
4. Focus on understanding how many food is needed to force out the reserve healers and their spacings. This should be your priority!
Example in the case of 1-5/6-1-1 // 2-1/2(33)-1-1-1-1-1
All we really need to know from this is:
1st call: 5/6 food on the 2nd healer
Reserves need 3 total food on the first healer and 7 total on the second after 33 seconds
5. Note your reserve and restock times.
Our last spawn for the 2nd call will be the 48 second reserve, the next reserve isn't going to be until 66 seconds which is during the 3rd call, so as soon as you've poisoned the first reserve - go and restock.
THIRD CALL
6. Make sure to finish all the good food before the call change - The last reserve should be lured by the defender, so try and repoison any healers near the defender or on your path back targetting high health or healers that are unpoisoned or ticking 2's or 1's. Then spam down the last reserve and lured healers to ensure you get the most out of your stocked food. You can then search for any stray healers.
Learning the 3rd call is the only way to hit the target times consistently but when you're first starting out make sure everything is ticking damage and you're getting your stocks off.
Writing codes you understand:
Hopefully now you have a basic understanding of what codes mean and with support from some good fundamentals you can progress into more advanced codes.
My final advice on codes:
Write the codes in your own words and have them written next to your screen - whether it's a piece of paper or runelite notes it helps!
Example of breaking down a code:
Wave 9 Reg.
30-36 spawns and 48-66 reserves
1-5/6-1-1
2-1/2 (after 33)
Repoison anything ticking a 3
Restock 2x os (after 48)
1-2-3-spam
Alternate ways of writing codes
You can write your codes in any format that works for you, some prefer to turn codes into letter sequences in order of when they are targeted or replace the spacing with repoison timings in the sequence of when they poison healers. Below are some examples.
Here's an advanced single overstock code for wave 6:
Single overstock: R - 42 48 {60-72}
3(18)-5-2(24)-2 //
Restock 3x os
0-0-0-1-spam-11
In this example A would be the first healer, B would be the second healer and so on...
W6: R-42 48
AA-BBBBB-C-A-DD-C //
rs: 3x os
D-Spam-11
or you could combine letter and number combinations or even colour code to identify the amount of food...
W6: R-42 48
A2-B5-C-A-D2-C //
3x os
D-Spam-11
or you could identify repoison (RP) times in the number sequence...
W6: R-42 48
2-5-(RP1)-1-2-RP3
3x os
1-spam-11
Adapting to bad spreads
Any healer can get good times with good spreads and this guide has already covered ways to help minimise bad spreads but this isn't something that can be eliminated entirely and as a healer you should expect to have to manage this. The key difference that separates really good, consistent healers from others is their ability to adapt to these different spreads.
Adapting to spreads isn't something that can simply be taught as it will differ between waves and the extent of the spread, these skillswill simiply come with experience. There are however, some basic fundamentals that you should be following.
1. Don't chase healers west.
If your healer targets the attacker or collector off a west runner or simply wanders to "Narnia" (i.e. the healer pool or ladder) you don't want to chase it. It's never worth losing DPS on multiple healers by poisoning spawns late and missing repoisons for the sake of a stray healer. It may also cause an even worse healer spread if healers target you and follow you west/south. Often healers will roam back naturally and you can poison them then, or you may be able to poison them on your way to/from restocking.
2. Use what you have.
If the stray healer is one that you need to force out spawns, you can alter the codes in your head. Use the other healers to force out reserves, or accept the fact that your spawn will be late.
If it's a code that requires you to stock after the first call such as on wave 6 or double overstock 7, then you can stay for the start of the second call to either correct it, or to poison the first reserve(s) before restocking.
3. Never stay north longer than 54 seconds on later waves.
On waves 7+ never stay longer than 54 seconds, if your reserves are not out by 54 seconds then it's best to just restock on time with extra food to spam it down, it's easier to spam down healers that are lured onto the defender than attempting to spam down a roaming healer that has de-aggroed on you at 60 seconds. In certain circumstances it may be easier just to repoison all the healers that are already out and going to restock early, then you'll have less repoisons during the third call so you can just focus on the last reserve(s) that the defender should have lured (and hopefully split if applicable).
4. Bring lures back to the trap.
If a reserve has targetted you and there are runners still alive or eggs in the cannon (such as on wave 10) then it's often worth running back towards the trap (or cannon), rather than attempting to spam them down at the dispenser. You may get lucky with a healer relure, or some extra dps from the cannon. The trap/cannon areas are also useful as you may be able to pin the healer against a wall to limit it's movement.
5. Target roaming healers first if you can.
If you notice an unlured healer near the dispenser or heading away from the trap area it pays to repoison it before going back to spam the reserve, this saves you chasing it later on if it roams even further. If healers have wandered to "narnia" let them go and deal with the bulk of the healers first before you chase them later on; It's not worth losing DPS on multiple healers for the sake of a stray healer.
6. Use the food you have stocked
If you know you're not going to be able to target the healer you want before the call change then it's better to make use of the food you have than to have food left over. If you do this during the first or second call on waves 8 and 9 be cautious not to force out the last reserve too early so the defender can still lure it. If it's during the third call spam down the last reserve and then you can go and target repoisons that are west or at logs, keep in mind if you're spreads bad and you know the wave time is going to be slightly longer than your ideal target time - the spam healer won't require as much food so you can leave to repoison earlier.
7. Keep an eye on the chat box.
Often ranks will be able to help you with targetting stray healers by calling their positions either in the clan chat or public chat if you're in range to see it.
Common abbreviations used:
Unp - Unpoisoned healer that is no longer ticking any poison.
RP - Repoison: A healer that is still ticking poison damage but still requires repoisoning
Stacked - If healers are stacked: usually called for unpoisoned healers who's health bars aren't visible such as the last reserve if it's stacked under another healer.
These abbreviations are usually followed by cardinal directions north - n, south - s, east - e, west - w, or landmarks such as logs, ladder, pool, horn, trap, mid (middle), etc. Example: rp w = repoison west.
8. Alter your restocks
- Depending on your spam ability, if spawns are going to be early/late, the spread is bad/good, whether you have to vial or not and what lures/relures the defender is able to get. Well calculated repoisons and spam will result in more consistent wave times than running out of food or not getting the food off and having to restock for a second time.
9. Swap the first 2 healers
As mentioned earlier, the first two healers are calculated using the same spawn time. Most codes will allow you to simply swap the first two healers in the code if your ideal spam healer roams away. For example, 1-9-1-1 can be executed as 9-1-1-1.
Late to poison
A good way to gauge if you've poisoned the second healer in time is to watch out for the immediate natural poison tick after you poison it, this excludes the first healer in which you should have poisoned before the second healer spawns. If you notice that you're late to poison a healer or if a healer ticks a 3 in a code that doesn't allow this, then use an extra food on it or accept that the spawn is going to be late and restock according to your spam ability; this may mean stocking more or less than you usually would as you'll have extra repoisons, this you will have to gauge accounting for your spam ability, healer lures/relures and the spread.
Wrong Overstock call
EVERYONE makes mistakes from time to time. If the defender makes a mistake and accidently calls incorrectly, forcing you to overstock the wrong food, it's generally faster to simply continue on with the wave and adapt, rather than heading to the ladder and resetting the wave. During the first call make sure you have enough food to poison each healer at least once and focus a healer to try and force out a reserve. The second call has a 50% chance of being what you've overstocked, if the second call is good then work backwards from the original code you were planning to use and force out spawns, repoisoning as normal. If it's not the food you have stocked then use what remaining food you have to repoison each of the healers as they tick 3s and try and continue to target the healer you focused during the first call to force out a reserve during the second call if you can, restock after poisoning the reserve.
Below is an example of the wrong overstock call on wave 5 where the target time of 54 seconds was still achieved with a lucky second call.
A Helpful Tool for Adapting Codes
Henkes Spacing Calculator

This tool can be used beyond just developing and testing codes.
If you're ever wondering about specific scenarios:
- How much food you need to force out certain reserves?
- How can I adapt to achieve certain wave times?
This is what this tool can tell you. Whether x amount of food will be enough and the spacing required to do it using as little food as possible.
For example if on wave 7 your first healer gets pulled into the a/c block, you could use your 3rd healer to force out a 48 or 54 spawn, plugging this scenario into the calculator will allow you to judge
Eventually you'll get to a stage where you can adapt without having to use this tool based on the healers health bar or from previous experiences of successful and unsuccessful waves. It just takes practice.
Any healer can get good times with good spreads and this guide has already covered ways to help minimise bad spreads but this isn't something that can be eliminated entirely and as a healer you should expect to have to manage this. The key difference that separates really good, consistent healers from others is their ability to adapt to these different spreads.
Adapting to spreads isn't something that can simply be taught as it will differ between waves and the extent of the spread, these skillswill simiply come with experience. There are however, some basic fundamentals that you should be following.
1. Don't chase healers west.
If your healer targets the attacker or collector off a west runner or simply wanders to "Narnia" (i.e. the healer pool or ladder) you don't want to chase it. It's never worth losing DPS on multiple healers by poisoning spawns late and missing repoisons for the sake of a stray healer. It may also cause an even worse healer spread if healers target you and follow you west/south. Often healers will roam back naturally and you can poison them then, or you may be able to poison them on your way to/from restocking.
2. Use what you have.
If the stray healer is one that you need to force out spawns, you can alter the codes in your head. Use the other healers to force out reserves, or accept the fact that your spawn will be late.
If it's a code that requires you to stock after the first call such as on wave 6 or double overstock 7, then you can stay for the start of the second call to either correct it, or to poison the first reserve(s) before restocking.
3. Never stay north longer than 54 seconds on later waves.
On waves 7+ never stay longer than 54 seconds, if your reserves are not out by 54 seconds then it's best to just restock on time with extra food to spam it down, it's easier to spam down healers that are lured onto the defender than attempting to spam down a roaming healer that has de-aggroed on you at 60 seconds. In certain circumstances it may be easier just to repoison all the healers that are already out and going to restock early, then you'll have less repoisons during the third call so you can just focus on the last reserve(s) that the defender should have lured (and hopefully split if applicable).
4. Bring lures back to the trap.
If a reserve has targetted you and there are runners still alive or eggs in the cannon (such as on wave 10) then it's often worth running back towards the trap (or cannon), rather than attempting to spam them down at the dispenser. You may get lucky with a healer relure, or some extra dps from the cannon. The trap/cannon areas are also useful as you may be able to pin the healer against a wall to limit it's movement.
5. Target roaming healers first if you can.
If you notice an unlured healer near the dispenser or heading away from the trap area it pays to repoison it before going back to spam the reserve, this saves you chasing it later on if it roams even further. If healers have wandered to "narnia" let them go and deal with the bulk of the healers first before you chase them later on; It's not worth losing DPS on multiple healers for the sake of a stray healer.
6. Use the food you have stocked
If you know you're not going to be able to target the healer you want before the call change then it's better to make use of the food you have than to have food left over. If you do this during the first or second call on waves 8 and 9 be cautious not to force out the last reserve too early so the defender can still lure it. If it's during the third call spam down the last reserve and then you can go and target repoisons that are west or at logs, keep in mind if you're spreads bad and you know the wave time is going to be slightly longer than your ideal target time - the spam healer won't require as much food so you can leave to repoison earlier.
7. Keep an eye on the chat box.
Often ranks will be able to help you with targetting stray healers by calling their positions either in the clan chat or public chat if you're in range to see it.
Common abbreviations used:
Unp - Unpoisoned healer that is no longer ticking any poison.
RP - Repoison: A healer that is still ticking poison damage but still requires repoisoning
Stacked - If healers are stacked: usually called for unpoisoned healers who's health bars aren't visible such as the last reserve if it's stacked under another healer.
These abbreviations are usually followed by cardinal directions north - n, south - s, east - e, west - w, or landmarks such as logs, ladder, pool, horn, trap, mid (middle), etc. Example: rp w = repoison west.
8. Alter your restocks
- Depending on your spam ability, if spawns are going to be early/late, the spread is bad/good, whether you have to vial or not and what lures/relures the defender is able to get. Well calculated repoisons and spam will result in more consistent wave times than running out of food or not getting the food off and having to restock for a second time.
9. Swap the first 2 healers
As mentioned earlier, the first two healers are calculated using the same spawn time. Most codes will allow you to simply swap the first two healers in the code if your ideal spam healer roams away. For example, 1-9-1-1 can be executed as 9-1-1-1.
Late to poison
A good way to gauge if you've poisoned the second healer in time is to watch out for the immediate natural poison tick after you poison it, this excludes the first healer in which you should have poisoned before the second healer spawns. If you notice that you're late to poison a healer or if a healer ticks a 3 in a code that doesn't allow this, then use an extra food on it or accept that the spawn is going to be late and restock according to your spam ability; this may mean stocking more or less than you usually would as you'll have extra repoisons, this you will have to gauge accounting for your spam ability, healer lures/relures and the spread.
Wrong Overstock call
EVERYONE makes mistakes from time to time. If the defender makes a mistake and accidently calls incorrectly, forcing you to overstock the wrong food, it's generally faster to simply continue on with the wave and adapt, rather than heading to the ladder and resetting the wave. During the first call make sure you have enough food to poison each healer at least once and focus a healer to try and force out a reserve. The second call has a 50% chance of being what you've overstocked, if the second call is good then work backwards from the original code you were planning to use and force out spawns, repoisoning as normal. If it's not the food you have stocked then use what remaining food you have to repoison each of the healers as they tick 3s and try and continue to target the healer you focused during the first call to force out a reserve during the second call if you can, restock after poisoning the reserve.
Below is an example of the wrong overstock call on wave 5 where the target time of 54 seconds was still achieved with a lucky second call.
A Helpful Tool for Adapting Codes
Henkes Spacing Calculator
This tool can be used beyond just developing and testing codes.
If you're ever wondering about specific scenarios:
- How much food you need to force out certain reserves?
- How can I adapt to achieve certain wave times?
This is what this tool can tell you. Whether x amount of food will be enough and the spacing required to do it using as little food as possible.
For example if on wave 7 your first healer gets pulled into the a/c block, you could use your 3rd healer to force out a 48 or 54 spawn, plugging this scenario into the calculator will allow you to judge
Eventually you'll get to a stage where you can adapt without having to use this tool based on the healers health bar or from previous experiences of successful and unsuccessful waves. It just takes practice.
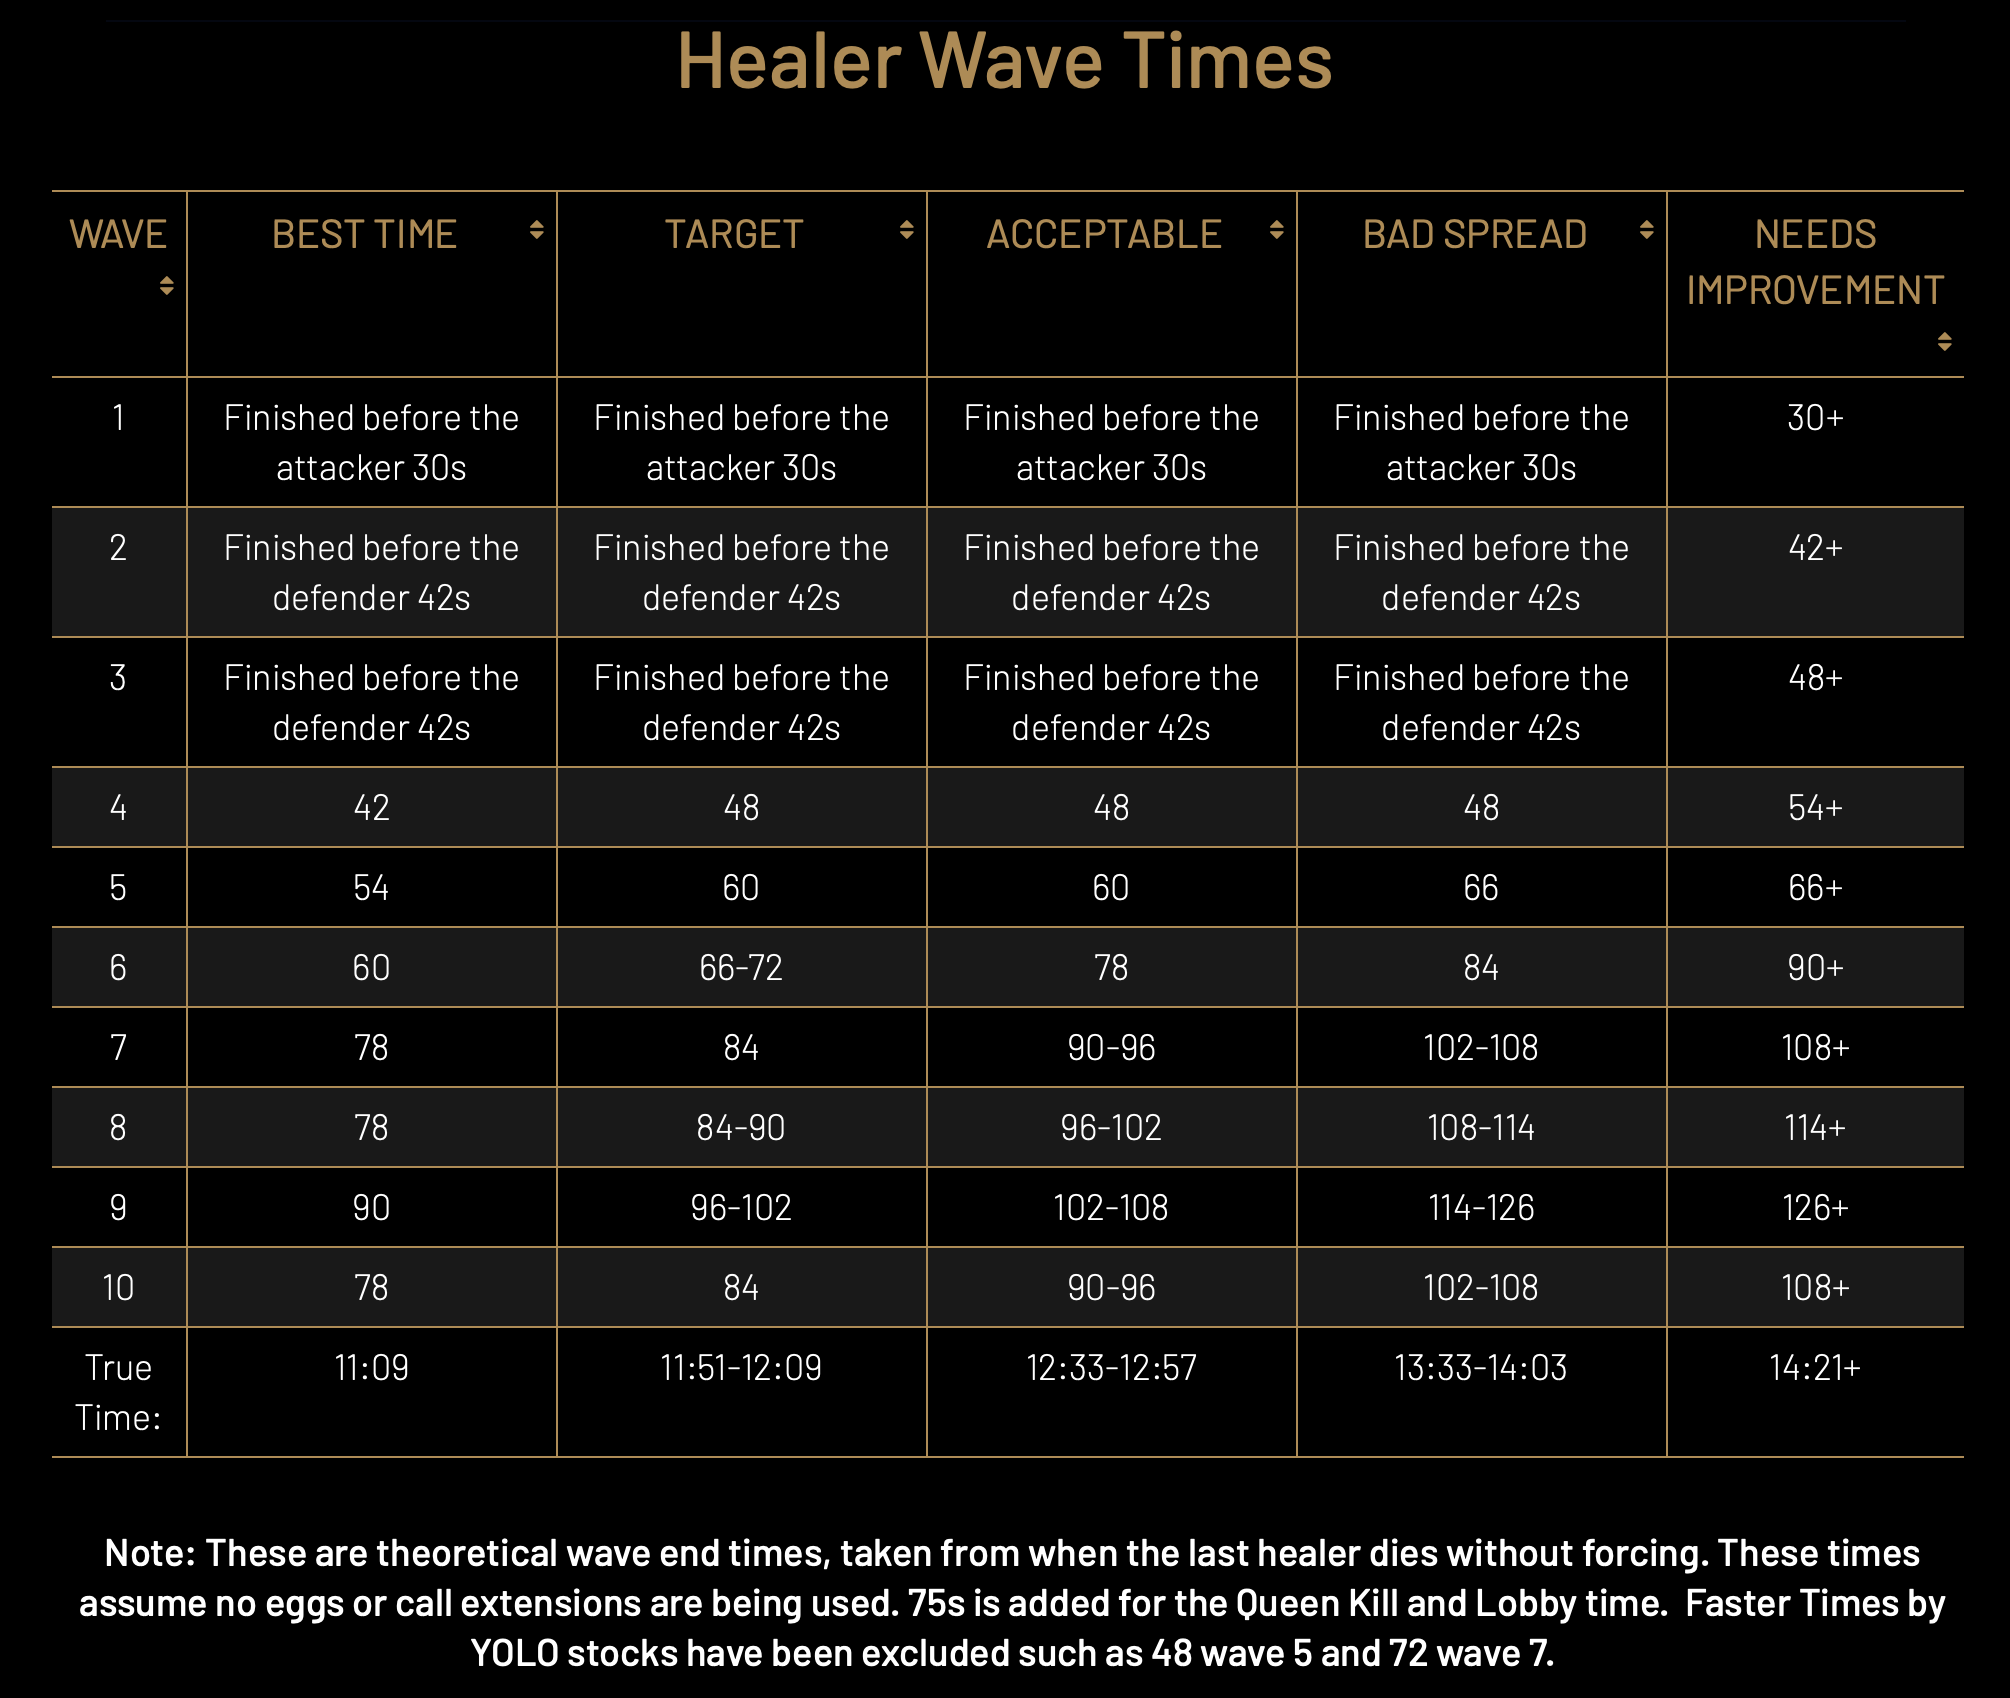
Understanding your heal times is important to gauge your progression, especially because in leeches you will not always be the last to finish each wave. For this reason we use theoretical wave end times to calculate your true time in a trial. To calculate your true time, you can either use an external timer or go off the runelite client's timer. It's worth noting that these theoretical times do no account for forced wave ends, as forcing isn't an attacker requirement. All wave end times are recorded in seconds.
Therefore, if your last healer dies at 81 seconds on wave 7 then your wave time would be 84 seconds regardless of when the defender and attacker finish, as the natural wave end check happens at 6 second intervals.
Early waves have a minimum finish time, these are 30s for wave 1, 42 seconds for wave 2, 48 seconds waves 3 & 4 and 48 seconds for wave 5. This is because the wave cannot end naturally due to the attacker and defender having to finish.
Note: 42 second wave 4 is possible but incredibly rare and requires some great rng from the attacker so 48 seconds is a more reliable and realistic finish time.
To calculate your true time, add all of your wave times together in seconds and then add 75 seconds to account for the queen kill and lobby time.
After you have calculated your cumulative time in seconds you can use a seconds to HH:MM:SS converter or manually covert it into minutes and seconds.
Example:
Wave 1: 30
Wave 2: 42
Wave 3: 48
Wave 4: 48
Wave 5: 57 -> 60
Wave 6: 75 -> 78
Wave 7: 87 -> 90
Wave 8: 99 -> 102
Wave 9: 108
Wave 10: 90
_____________
+ 75 seconds
_____________
= 771 seconds
_____________
True time = 12:51
What codes to use:
If you're a complete beginner to healer then start off with the regular codes, after mastering the technique and spacing aspects of codes then you can move onto overstock codes if you wish. You can easily pass a trial with well applied regular codes.
If you think you're ready for overstock and you have decent mouse accuracy then you can start with applying overstock codes on waves 5, 6, 8 (recommended 1-9-1-1) & 9. If you're switching to overstock then these codes should be practiced first to ensure you can apply them correctly before attempting them in paid runs. Waves 6, 8 and 9 are where you will benefit the most from overstock codes. Certain overstock codes will allow for easier second and third calls. However, they are only worth using if you can consistently get the first call codes off.
Recommended codes
The following codes are certainly not required to pass a trial. They are chosen because of the spawn times, ease of application and their consistency to execute satisfactory times. You can choose to experiment with other codes or more advanced codes if you feel comfortable.
Regular stock: Waves 1-4
Overstock: Wave 9
If you're a complete beginner to healer then start off with the regular codes, after mastering the technique and spacing aspects of codes then you can move onto overstock codes if you wish. You can easily pass a trial with well applied regular codes.
If you think you're ready for overstock and you have decent mouse accuracy then you can start with applying overstock codes on waves 5, 6, 8 (recommended 1-9-1-1) & 9. If you're switching to overstock then these codes should be practiced first to ensure you can apply them correctly before attempting them in paid runs. Waves 6, 8 and 9 are where you will benefit the most from overstock codes. Certain overstock codes will allow for easier second and third calls. However, they are only worth using if you can consistently get the first call codes off.
Recommended codes
The following codes are certainly not required to pass a trial. They are chosen because of the spawn times, ease of application and their consistency to execute satisfactory times. You can choose to experiment with other codes or more advanced codes if you feel comfortable.
Regular stock: Waves 1-4
- 1-2
- 1-2-3 - Block the last runner
- 1-6[24]-1/2 // Block last runner then - 3 food on reserve healer
- 1-4-3 // Spam
- 1-5-2-1 // 0-0-0-1-7
- 3(18)-5-2(21)-2 //
Restock 1x - 3x os
0-0-0-1-spam-spam //
0-0-0-0-spam-spam
- 2(21)-4/5(27)-1-1 //
1-0/1(33)-1(39)-1(45)-4(48)-1 //
Restock
0-0-0-0-0-x-12
- 1-9-1-1 //
1-0-1-1(33)-2(42)-2 //
Restock 2x os
1-15
Overstock: Wave 9
- 2-8(21)-1-1 //
1(33)-0-1(33)-1(39)-2(45)-1-1 //
Restock 2x-3x os
1-2-3-12
- 2(21)-4/5(27)-1-1 //
1-0/1(33)-1(39)-1(45)-4(48)-1 //
Restock
0-0-0-0-0-x-12
Special thanks to:
- Xansland, Blue Whales, Zachulous & Infra Low for helping with gathering footage used for this guide.
- Henke, Gau Cho, Faardo, Drop Trou & LHC for your contributions to healer research.
- Henke for creating the spacing calculator.
- Furret for helping to review and refine this guide.
- Chris & Spud for unconsciously inspiring this guide with your high level gameplay.
Last edited: