


Learning the Defender role should come in steps. You should learn the basics, and then slowly incorporate more advanced techniques as your skill level increases.
This page provides a roadmap of how you should learn the Defender role from scratch. The most important things to look at are in the VIDEOS that are linked in every part. The text here just serves to clarify a few points from the video, but 99% of your learning should be from the video itself.
1. Starting Out
Begin with LHC's Beginner Defender Guide: https://baservices.site/threads/33/
Additional comments:
2. Wave-specific Strategies, Delaying and Healer Lures
Next, look at LHC's Wave Breakdown: https://baservices.site/threads/65/. I would focus first on the wave breakdown, and then the recoveries. I would focus on healer lures last.
Additional comments:
3. Advanced Strategies
We will now turn our attention to LHC's Advanced Defender Guide: https://baservices.site/threads/31/. It repeats some of the previous information, but has good information on body blocks and healer lures. It also may be helpful with multikilling blocked runners. After you are comfortable with this video, you should try trialling with us!
Some of the strategies discussed in the guide are NOT required in the trial:
If you have ALREADY passed the Defender trial and are very comfortable in your role, you may consider picking up a few extremely advanced techniques. None of these are expected in a trial.
This page provides a roadmap of how you should learn the Defender role from scratch. The most important things to look at are in the VIDEOS that are linked in every part. The text here just serves to clarify a few points from the video, but 99% of your learning should be from the video itself.
1. Starting Out
Begin with LHC's Beginner Defender Guide: https://baservices.site/threads/33/
Additional comments:
- The trap can display (2), (1) or (0). This indicates how many more runners the trap can kill. Only repair the trap when it is at (0). At this stage, do not repair the trap at (1).
- Here is a safer log count for beginners who have not yet learned the multikill. Once you learn the multikill, you should reduce the number of logs to what is indicated in the video. Eventually, after getting comfortable with the defender role, you should only be taking a maximum of 2 logs per wave.
- Hammer and Logs (Safer - No multikills)
- Wave 1-4: 1 log
- Wave 5-7: 2 logs
- Wave 8: 3 logs
- Wave 9: 4 logs
- Wave 10: 2 logs
- Hammer and Logs (Original - With multikills)
- Wave 1-4: 1 log
- Wave 5-8: 2 logs
- Wave 9: 3 logs
- Wave 10: 2 logs
- Hammer and Logs (Safer - No multikills)
2. Wave-specific Strategies, Delaying and Healer Lures
Next, look at LHC's Wave Breakdown: https://baservices.site/threads/65/. I would focus first on the wave breakdown, and then the recoveries. I would focus on healer lures last.
Additional comments:
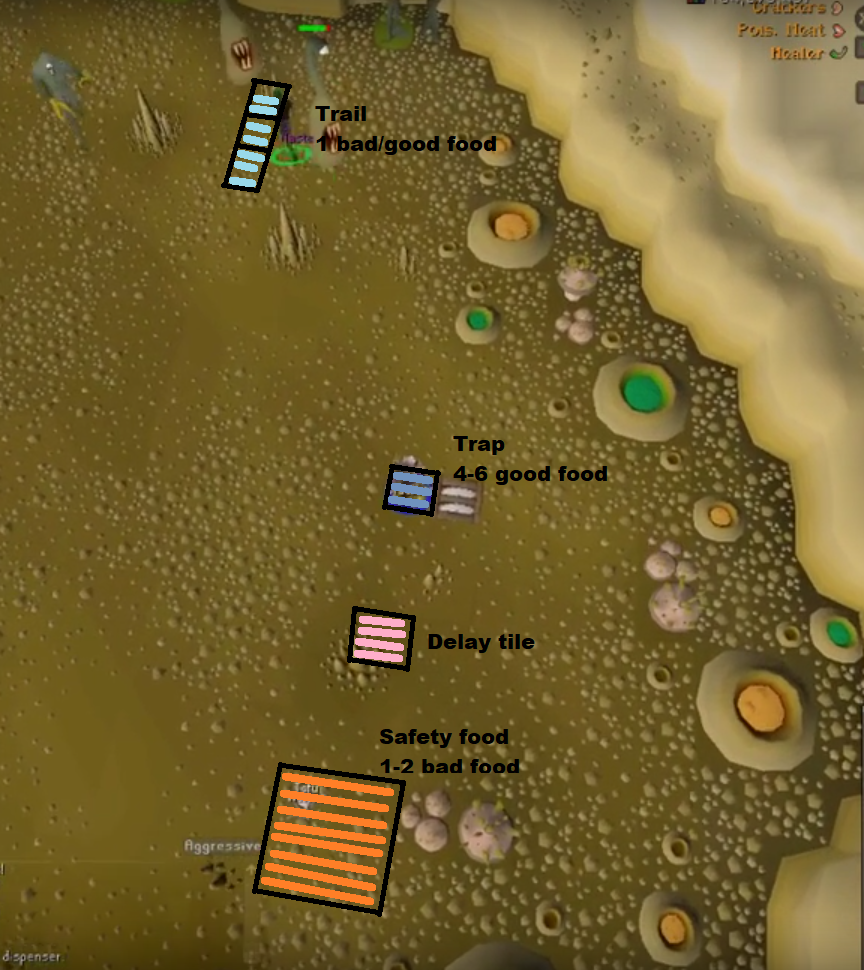
- Although not explicitly mentioned in the above video, you should also place a safety food on waves 5-9 when delaying for the second healer to spawn. See this video at 2:54: There is an extra bad food dropped during the time while waiting for the second healer to spawn. You should always do this because you are waiting for the second healer to spawn anyways. This safety food is mandatory to recover runners gone far south. I recommend dropping two bad food here just in case of mistakes, but a good defender will only need to place one bad food.

- What is "staggering"? Just to be entirely clear, staggering means that you kill all but the last two runners. After repairing the trap, you don't need to try and multikill the last two runners since they will automatically die on the trap. This allows you to run around to catch healer lures while there are still some runners alive. Staggering is used on waves 6-10.
- The acceptable location for food on wave 10 should be clarified. When placing food near the runner spawn, there are only truly 3 acceptable tiles where things will work. Your reference point should be the little "spike" tile which is the top tile where it is acceptable to place the food.
- I would not bother attempting the "Luring 54 on Wave 9". I would not bother attempting the "loop lure" mentioned under "Delays"
3. Advanced Strategies
We will now turn our attention to LHC's Advanced Defender Guide: https://baservices.site/threads/31/. It repeats some of the previous information, but has good information on body blocks and healer lures. It also may be helpful with multikilling blocked runners. After you are comfortable with this video, you should try trialling with us!
Some of the strategies discussed in the guide are NOT required in the trial:
- You do NOT need to do healer relures as explained at 12:00-15:10 for the trial. However, expert defenders will make use of this, so it would be a good thing to learn AFTER you have mastered everything prior to this.
- You should NOT use alternate mainstack and trap locations as explained at 16:44-17:00. Only if you are planning on joining speedrunning teams would I consider learning about alternate placement locations
If you have ALREADY passed the Defender trial and are very comfortable in your role, you may consider picking up a few extremely advanced techniques. None of these are expected in a trial.
- Healer relures (LHC's Advanced Defender Guide) - quite useful
- Alternative method: twolesslives' guide
- Wave 10 relure: http://s15.zetaboards.com/CasualBA/topic/10474079/1/
- No-logging Wave 4 and Wave 5 (killing the runners 1-3 and 1-4 respectively, without picking up any logs) - prevents fighters from wandering east.
- Wave 9: 2-1-4-2 kill strategy for better healer lures.
- Hendi's advanced reluring strategies:
Last edited by a moderator: